Showing posts with label Christmas. Show all posts

Wednesday, December 16, 2015

Vintage Elephant Noel Card

I'm Card Captain of the enjoyMichaelStrongstamps Yahoo Group for this week, so for 5 days I'll be showing you several works using Michael Strong's stamps. I hope you'll find them inspiring.

My 3rd card for this week is a Vintage Elephant Noel Card.

It's a Vintage style Noel (Christmas) card in non-traditional colors, and I assume that the Elephant carrying the holiday's gifts isn't the traditional Santa's sleigh either (lol).


I used a Kraft card basis, and contrasting shades of brown with strong turquoise for a non-traditional, and therefore more special color combo.
The Noel sentiment was made of wood and colored on mat gold, enhanced by a dark brown framing paper and a turquoise bling.

The patterned background paper is in shabby chic style, complementing the other elements.
It was inked all around, to give it a distinct, eye-catching frame.


I stamped it on a contrasting turquoise CS using VersaFine Ink - Black Onyx, and cut it with scissors, then added a tiny bling to enhance the eye.
The Noel sentiment, as well as the Elephant, were glued 3D for extra dimension – you can see how it actually adds volume to the card.
Several blings were added for extra glam.


(You can enlarge each photo by clicking on it) 
Thanks for stopping by, I hope you enjoyed. Have a creative day! Dorly

Vintage Letter Thank You Card

I'm Card Captain of the enjoyMichaelStrongstamps Yahoo Group for this week, so for 5 days I'll be showing you several works using Michael Strong's stamps. I hope you'll find them inspiring.

My 2nd card for this week is a Thank You card in Vintage colors, using a Kraft card basis and Kraft CS for the stamped sentiment, which is the dictionary definition of the word Todah (i.e. thank you, in Hebrew).

The patterned paper background paper is in shabby chic style, and the patterned paper used for the Rosette was designed with old letters and post cards.


I stamped it on a contrasting light blue paper using VersaFine Ink - Black Onyx, and cut it using Michael Strong's Mini Wings Metal Die Cutter Set -  they are so easy and fun to use!


I also used Tim Holtz Rosette (large) with a snowflake on top of it, which was cut out of a Vintage patterned paper, as a tribute for Christmas and for a dramatic 3D look.
Both the Rosette and the stamped tag with the sentiment were inked all around, to give them a distinct, eye-catching frame.

I glues the Rosette, The sentiment and the Hummingbird 3D, and added several colorful blings.

You can enlarge each photo by clicking on it) 
Thanks for stopping by, I hope you enjoyed. Have a creative day! Dorly

Tuesday, December 15, 2015

Japanese Fan and Flowers Card

I'm Card Captain of the enjoyMichaelStrongstamps Yahoo Group for this week, so for 5 days I'll be showing you several works using Michael Strong's stamps. I hope you'll find them inspiring.

My 1st card for this week is a Christmas card in non-traditional colors, using Japanese themed elements.


I used Michael Strong's Cloisonné Silhouette Fan stamp (medium) from the Cloisonné Silhouette Fan set.
I heat embossed it in white, and accented it with colorful blings.


I also used Tim Holtz Snowflake Rosette for a dramatic 3D look.
I think it actually makes everything pop out!


(You can enlarge each photo by clicking on it)
Thanks for stopping by, I hope you enjoyed. Have a creative day! Dorly

Friday, November 6, 2015

Merry Christmas Card with Washi Tape and Christmas Tree with Tutorial

I'm Card Captain of the enjoyMichaelStrongstamps Yahoo Group for this week, so for 5 days I'll be showing you several works using Michael Strong's stamps. I hope you'll find them inspiring.

My 4th card for this week is a Merry Christmas Card with Washi Tape and 
Christmas Tree.

It is followed by a step-by-step tutorial, with photos.

I hope you'll try it and enjoy it… It takes less time to make the card than to post 
about it (lol)


Today's card is all about making the background papers yourself.
This technique is fun and easy, and it enables you to create various backgrounds, to make different cards.

I made the main background by stamping Snowflakesfrom Designs by Ryn on a leather textured red CS.


I also stamped the sentiment "Merry Christmas" on a scrap of the same red leather textured CS, and inked its edges using Platinum ink, the same ink I used to stamp the Snowflakes, to enhance it.
I also added 2 brads, all shiny and bright.
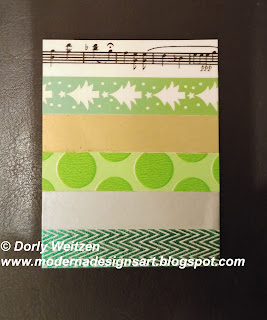
Then I used a piece of plain white CS, which I wrapped with several stripes of Washi Tape in Christmas related colors and themes.
You can use any combination of Washi Tape, I simply picked those which will pop out and will be contrasted to the red background. Once you're satisfied with the size of the wrapped CS, you can trim its edge off.

Here's the CS wrapped with Washi Tape:


And as Washi Tape sometimes has a tendency to become loose (it doesn't always stick to its place), I wrapped it behind both sides of the CS, and I adhered the 3D double sided foam tape on the back side of the CS exactly ON the Washi Tape's ends, so the foam tape secures them:


I stamped and heat embossed it on a scrap of the same red leather textured CS, then I cut it and added a few pearls for some more glam.
I adhered the Snowflakes background paper to the card basis, then the Washi Tape background paper and the decorated piece with the sentiment, using a double sided foam tape for a 3D effect.
I added the Christmas Tree on top of the Washi Tape background paper, also 3D. You can see it in 2 different color combos.

You can see the 3D effect here:


It sure feels like the right time to create Christmas Card.

We don't celebrate Christmas in Israel, but I'd like to send Christmas cards to my friends worldwide who celebrate Christmas.


Please let me know if you liked my tutorial, if it was clear (I'm always happy to answer questions), and if it made you want to create something similar.

(You can enlarge each photo by clicking on it) 
Thanks for stopping by, I hope you enjoyed. Have a creative day! Dorly

Wednesday, December 12, 2012

Leaping Reindeer Christmas Card

I made this Christmas card using a few of Tim's die cuts.
The colors are quite traditional.
I like the BG background paper, and it seems that the golden snowflake add some glam.
Most items were glued 3D for extra dimension.

Merry Christmas!

(You can enlarge each photo by clicking on it)
Thanks for stopping by, I hope you enjoyed. Have a creative day! Dorly

Friday, February 3, 2012

Angels Christmas Card

Here is my 5th card for this week as Card Captain of the enjoyMichaelStrongstamps Yahoo Group.
It's a Christmas card with a romantic background.

Supplies used:
Cream CS for the card's basis
Turquoise CS
Background patterned paper - Christmas book by Crafty Individuals
Shiny gold paper
Michael Strong's Cloisonné Christmas Tree Set of 3 (small and medium)
Embossing ink
Black EP
TH scissors
Martha Stewart's Gothic Arches edge punch
1" Snowflake punch
White and red half pearls with sticky back
Double sided foam tape

I punched the turquoise CS and layered the papers.
I stamped Michael Strong's Cloisonné Christmas Tree small and medium stamps on turquoise CS, heat embossed it with black EP and cut it carefully using TH scissors.
Both trees were glued 3D for extra dimension.
I added shiny gold snowflakes and several the colorful checkered ribbon, and also several white and red half pearls for extra glam.
BTW the musical notes sheet was only used as a background paper for taking photos.


(You can enlarge each photo by clicking on it)
Thanks for stopping by, I hope you enjoyed. Have a creative day! Dorly

Thursday, February 2, 2012

Mini Cards And Mini Envelopes

Here are my 4th creations for this week as Card Captain of the enjoyMichaelStrongstamps Yahoo Group.
I decided to share 2 Mini Cards and Mini Envelopes.
It's Technique Thursday, therefore I used the attached tutorial.

I have no idea where I got it from, so if you recognize its source please tell me so I can link back to it.

Supplies used:
Japanese patterned paper - Making Memories
Red and grey leather textured CS for stamping
Michael Strong's Cloisonné Fan Stamp (small)
Michael Strong's Cloisonné Christmas Tree Set of 3 (small)
StazOn ink - Jet Black
Embossing ink
Black EP
Scor-Pal
EK Success corner Adorner
TH scissors
A colorful checkered ribbon
Clear and red blings
Double sided tape

I created the mini envelope according to the how-to shown here.
I glued the envelope using double sided tape.
I used Making Memories double sided CS, so both the inside and the outside of the envelope look nice.
I cut two 3x3 mini cards out of the same CS, to match the envelope.
I rounded the envelope's and the cards' corners using EK Success corner Adorner.


I stamped Michael Strong's Cloisonné Fan small stamp on red leather textured CS using StazOn ink - Jet Black, and cut the stamped pieces using TH scissors.


Then I stamped Michael Strong's Cloisonné Christmas Tree small stamp on red and grey leather textured CS, heat embossed it with black EP and cut it carefully using TH scissors.

Then I added the colorful checkered ribbon, and also several clear and red blings for extra glam.
BTW the musical notes sheet was only used as a background paper for taking photos.
(You can enlarge each photo by clicking on it)

Thanks for stopping by, I hope you enjoyed. Have a creative day! Dorly

Sunday, January 29, 2012

Christmas ATCs Swap

Recently I hosted a Christmas ATCs swap at the AllThingsTim-Euro Yahoo group.
We don't celebrate Christmas, but it's a lovely holiday and I enjoy creating Christmas related items.
Here are the ATCs I created (I made 6 similar ATCs).


Supplies used:
Recycled thick CS for the ATC
Background papers - patterned paper by Crafty Individuals - Book 2 (Christmas)
Black, red, green, brown, Kraft and cream CS
Sizzix Bigz Die - Reindeer Flight by Tim Holtz
Recycled white CS for the snowflakes
Snowflake 1" punch
Round tiny clear blings
White half pearls with sticky back
3D double sided foam tape
Diamond Glaze
Snowflake stamp from my stash
Black VersaFine ink


First I cut and adhered the background papers to the ATCs.
Then I added the the Reindeer, glued 3D for extra dimension.
I glued the punched out snowflakes using Diamond Glaze.
I added tiny clear blings for the Reindeer's eyes and white half pearls on the white snowflake, for extra glam.
I added my details on the back side of the ATC and stamped the Snowflake stamp in black ink for more decoration.


Here are my 6 ATCs:


(You can enlarge each photo by clicking on it)

Thanks for stopping by, I hope you enjoyed. Have a creative day! Dorly

Saturday, December 24, 2011

Tree and Reindeer Christmas Card

This Christmas card was made by a special request to be sent to an Irish lady.


Ingredients:

Light green canvas textured CS for the card's basis
Background patterned paper - Christmas book by Crafty Individuals
Red leather textured CS (the tree)
Forest green CS (the reindeer)

Off white CS (the standing reindeer)
Shiny gold paper
Red envelope
Sizzix Bigz Die - Reindeer by Tim Holtz
Michael Strong's Cloisonné Christmas Tree Die Cutter (large)
1" snowflake punch
Iron Gate Edger Punch by Martha Stewart
Tiny clear bling (for the reindeer's eye)
White and red half pearls (with sticky back)

Gold Gel pen


I cut and punched the papers and layered the images on top of them.
Both the tree and the reindeer were glued 3D for extra dimension.
I added half pearls and a bling for some Christmas glam.


I added one more reindeer inside the card, with a golden eye.


Merry Christmas to you and to your loved ones!
I hope your holiday is filled with laughter and joy, and I wish you a year of light and love!
Dorly

(You can enlarge each photo by clicking on it)

Thanks for stopping by, I hope you enjoyed. Have a creative day! Dorly

Thursday, December 1, 2011

Michael Strong Holiday Tag Blog Hop

Here's my Christmas Tag for the Michael Strong's Yahoo group Holiday Tag Blog Hop.
Thank you for stopping by today.
I hope you'll be inspired to make your own holiday tag.
Although we don't celebrate Christmas, I make Christmas and Holiday cards and tags for my overseas friends, and I think it's a fabulous season (and a good excuse to create some more!)

Supplies used:
White CS for the tag's basis
Merry Christmas patterned paper from my stash
Grey leather textured CS
Michael Strong's Cloisonné Christmas Tree Stamp (medium & small)
Embossing ink
Hematite EP
Tim Holtz Tonic Paper Distresser
Blending tool
Ranger Distress Ink - Pine Needles
Red ribbon
Checkered fabric heart-shaped buckle
Clear, green and red blings
Fibers from my stash

You're welcome to leave a comment in each blog. Enjoy your tour!
Your next stop is Heidi's blog
If you get lost you can see the list of participants in Hetty's blog
There's also a bonus: search the letters in each blog.
My letter is "y".
When you have collected all 13 letters from all 13 blogs, make a wish out of them and you'll enter a prize drawing.
The prize will be a Michael Strong stamp, of course.
Send your answer to Hetty privately: buzzy4you@hotmail.com NOT in the comment!
Hetty will pick a winner on Wednesday, December 7th.

Have a wonderful holiday season!
(You can enlarge each photo by clicking on it)
Thanks for stopping by, I hope you enjoyed. Have a creative day! Dorly

Friday, October 7, 2011

Shiny Christmas Tree Card

I'm Card Captain of the enjoyMichaelStrongstamps Yahoo Group for this week, so for 5 days I'll be showing you several works using Michael Strong's stamps. I hope you'll find them inspiring.
Here's my 5th card for this week. I used my new Christmas Tree Die Cutter to create a shiny Christmas card.


Ingredients:
Cream leather textured CS for the card's basis
Red leather textured CS for the Christmas Tree cut-out
Patterned paper - Basic Grey - Wassail
White photo paper
Michael Strong's Christmas Tree Die Cutter
Snowflake punch (1 inch)
Clear, green and red blings


I used Michael Strong's Christmas Tree Die Cutter to cut a Christmas Tree shaped hole in my red CS. It cuts like butter, it's a pleasure to work with these cutters.
I used the background piece which was left from the cut-out tree (I'll save the cut-out tree for a later project).
I added the Basic Grey patterned paper at the back of the cut-out tree.
I added several snowflakes, punched out of photo paper which is very white and resembles snow.
I added quite a few clear, green and red blings to add some glam. You can never use too many blings…

(You can enlarge each photo by clicking on it)

Thanks for stopping by, I hope you enjoyed. Have a creative day! Dorly

Wednesday, October 5, 2011

Ornamental Christmas Card

I'm Card Captain of the enjoyMichaelStrongstamps Yahoo Group for this week, so for 5 days I'll be showing you several works using Michael Strong's stamps.
I hope you'll find them inspiring.
Here's my 3rd card for this week - it is an Ornamental Christmas Card.
We don't celebrate Christmas in Israel, yet I find the Christmas decorations very festive and elegant.
The main motif in this card is the Christmas tree, and the colors I chose are rather traditional Christmas colors.

Ingredients:
Cream leather textured CS for the card's basis
Patterned paper - Christmas Background paper pad by Crafty Individuals
Gold paper
Dark grey leather textured CS
Spellbinders Nestabilities - LATTICE RECTANGLES (medium)
Michael Strong's Cloisonné Christmas Tree Stamp (small)
Embossing ink
Black EP
Brown ink
Gold organza ribbon
Red and clear blings

I chose these colors to create an elegant and festive card.
If you look closely you'll notice that unlike usual Christmas trees, the ornaments here serve as a background while the trees are situated on top of them.
The background paper was slightly distressed using brown ink.
I stamped Michael Strong's Cloisonné Tree on dark grey leather textured CS, heat embossed it with black EP and cut it out using TH scissors.
The trees were glued 3D with foam tape for extra dimension, and so was their gold background, which was cut using Spellbinders Nestabilities - LATTICE RECTANGLES (medium).
I added red and clear blings for extra glam.
I also added a piece of gold organza ribbon.

(You can enlarge each photo by clicking on it)
Thanks for stopping by, I hope you enjoyed. Have a creative day! Dorly