Showing posts with label embossing. Show all posts

Tuesday, December 15, 2015

Japanese Fan and Flowers Card

I'm Card Captain of the enjoyMichaelStrongstamps Yahoo Group for this week, so for 5 days I'll be showing you several works using Michael Strong's stamps. I hope you'll find them inspiring.

My 1st card for this week is a Christmas card in non-traditional colors, using Japanese themed elements.


I used Michael Strong's Cloisonné Silhouette Fan stamp (medium) from the Cloisonné Silhouette Fan set.
I heat embossed it in white, and accented it with colorful blings.


I also used Tim Holtz Snowflake Rosette for a dramatic 3D look.
I think it actually makes everything pop out!


(You can enlarge each photo by clicking on it)
Thanks for stopping by, I hope you enjoyed. Have a creative day! Dorly

Friday, November 6, 2015

Bird and Flower Inspiration Card

I'm Card Captain of the enjoyMichaelStrongstamps Yahoo Group for this week, so for 5 days I'll be showing you several works using Michael Strong's stamps. I hope you'll find them inspiring.
My 5th card for this week is a clean and simple Bird and Flower Inspire Card.


I used Michael Strong's Cloisonné Flower stamp (small) from the MiniShapes set, which I heat embossed and cut, then adhered it 3D.
I used a patterned paper for the background (for a change… lol) along with a swirly Bird die cut, an Inspire stamp and several blings.


(You can enlarge each photo by clicking on it) 
Thanks for stopping by, I hope you enjoyed. Have a creative day! Dorly

Merry Christmas Card with Washi Tape and Christmas Tree with Tutorial

I'm Card Captain of the enjoyMichaelStrongstamps Yahoo Group for this week, so for 5 days I'll be showing you several works using Michael Strong's stamps. I hope you'll find them inspiring.

My 4th card for this week is a Merry Christmas Card with Washi Tape and 
Christmas Tree.

It is followed by a step-by-step tutorial, with photos.

I hope you'll try it and enjoy it… It takes less time to make the card than to post 
about it (lol)


Today's card is all about making the background papers yourself.
This technique is fun and easy, and it enables you to create various backgrounds, to make different cards.

I made the main background by stamping Snowflakesfrom Designs by Ryn on a leather textured red CS.


I also stamped the sentiment "Merry Christmas" on a scrap of the same red leather textured CS, and inked its edges using Platinum ink, the same ink I used to stamp the Snowflakes, to enhance it.
I also added 2 brads, all shiny and bright.
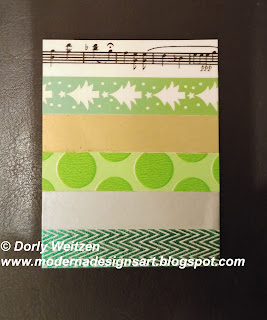
Then I used a piece of plain white CS, which I wrapped with several stripes of Washi Tape in Christmas related colors and themes.
You can use any combination of Washi Tape, I simply picked those which will pop out and will be contrasted to the red background. Once you're satisfied with the size of the wrapped CS, you can trim its edge off.

Here's the CS wrapped with Washi Tape:


And as Washi Tape sometimes has a tendency to become loose (it doesn't always stick to its place), I wrapped it behind both sides of the CS, and I adhered the 3D double sided foam tape on the back side of the CS exactly ON the Washi Tape's ends, so the foam tape secures them:


I stamped and heat embossed it on a scrap of the same red leather textured CS, then I cut it and added a few pearls for some more glam.
I adhered the Snowflakes background paper to the card basis, then the Washi Tape background paper and the decorated piece with the sentiment, using a double sided foam tape for a 3D effect.
I added the Christmas Tree on top of the Washi Tape background paper, also 3D. You can see it in 2 different color combos.

You can see the 3D effect here:


It sure feels like the right time to create Christmas Card.

We don't celebrate Christmas in Israel, but I'd like to send Christmas cards to my friends worldwide who celebrate Christmas.


Please let me know if you liked my tutorial, if it was clear (I'm always happy to answer questions), and if it made you want to create something similar.

(You can enlarge each photo by clicking on it) 
Thanks for stopping by, I hope you enjoyed. Have a creative day! Dorly

Wednesday, November 4, 2015

An Ocean of Fun and Adventure Card


I'm Card Captain of the enjoyMichaelStrongstamps Yahoo Group for this week, so for 5 days I'll be showing you several works using Michael Strong's stamps. I hope you'll find them inspiring.

My 2nd card for this week is An Ocean of Fun and Adventure Card.


My son just got his Scuba Diving license in the mail, so I simply had to recycle the lovely nautical themed paper which came with it.
I created the background by stamping over that paper, and added some Washi Tape and a postal stamp.
I stamped Michael Strong's Fish, heat embossed it and cut it, then I added a few pearls which seem like the bubbles coming out of its mouth.

Then I pearls and blings to add some glam.

(You can enlarge each photo by clicking on it) 
Thanks for stopping by, I hope you enjoyed. Have a creative day! Dorly

Wednesday, October 7, 2015

Winged Fairy Halloween Card

I'm Card Captain of the enjoyMichaelStrongstamps Yahoo Group for this week, so for 5 days I'll be showing you several works using Michael Strong's stamps. 
I hope you'll find them inspiring.

My 3rd card for this week is a Winged Fairy Halloween Card.


It's another very detailed card in typical Halloween colors, made with some help from my dear friend Kelli Green.


I used Michael Strong's Cloisonné Leaves stamp (large), which I stamped on a transparent sheet and cut the leaves, and then I adhered them using a transparent double sided tape, so that the Fairy seems to be flying with her wings in the air.
Actually, she's supposed to be a witch… but she's too cute for that, isn't she?

You can see the 3D effect when looking at the card from a different angle.


I also stamped both sides of the envelope, leaving space for the address and postal stamps.

I hope you got some more Spooky Halloween inspiration!


(You can enlarge each photo by clicking on it) 
Thanks for stopping by, I hope you enjoyed. Have a creative day! Dorly

Tuesday, October 6, 2015

Spooky Pot Fairy Halloween Card

I'm Card Captain of the enjoyMichaelStrongstamps Yahoo Group for this week, so for 5 days I'll be showing you several works using Michael Strong's stamps. I hope you'll find them inspiring.

My 2nd card for this week is a Spooky Pot Fairy Halloween Card.


It's a very detailed card in typical Halloween colors, made with some help from my dear friend Kelli Green.


I used Michael Strong's Cloisonné Pot stamp (large), which I heat embossed and cut, and then turned it upside down, so that the Fairy seems to be emerging out of the container.


Actually, she's supposed to be a witch… but she's too cute for that, isn't she?
You can see the 3D effect when looking at the card from a different angle.


I also stamped both sides of the envelope, leaving space for the address and postal stamps.

I hope you got some Spooky Halloween inspiration!


(You can enlarge each photo by clicking on it) 
Thanks for stopping by, I hope you enjoyed. 
Have a creative day! Dorly

Monday, October 5, 2015

Happy Birthday Butterfly Card

I'm Card Captain of the enjoyMichaelStrongstamps Yahoo Group for this week, so for 5 days I'll be showing you several works using Michael Strong's stamps. I hope you'll find them inspiring.
My 1st card for this week is a Happy Birthday Butterfly Card, quite simple but pretty.


I used Michael Strong's Cloisonné Butterfly stamp (small) from the Mini Wings set.
The Happy Birthday script is my own handwriting.


(You can enlarge each photo by clicking on it) 
Thanks for stopping by, I hope you enjoyed. Have a creative day! Dorly

Wednesday, April 16, 2014

Spring is the time of plans and projects ATB

For a very long period of time I've been engaged with family duties, unfortunately very unhappy ones.
During this time I rarely created anything, and as much as I wanted to, I couldn't find peace of mind and passion to create. My blog has also been neglected.
Now I got my MOJO back, and it feels so good!!!

I needed to share it with you. I still have several former unpublished creations to share with you, and I also plan a little Giveaway soon. Stay tuned!


But for now here's my entry to the enjoyMichaelStrongstamps Yahoo Group Spring challenge - a Spring ATB.

I made the 3D cube myself, out of sturdy CS, and it was such fun that I guess I'll make more ATBs in the near future.


Materials used:
Sturdy 12x12 Polka Dot CS by Netanella – Hot Air Ballons  collection
Scor-Pal
Red, light blue and black leather textured CS
Cream paper
Michael Strong Honeycomb stencil
Michael Strong Stamps: Cloisonné Butterfly (small and large), Cloisonné Flower (small)
Michael Strong Metal Die Cutters: Butterfly (small and large), Flower (small)  
Ranger Distress Ink - Fired Brick
Ranger Ink Blending Tool
VersaFine Ink - Onyx Black
White and light blue EP
Polka Dot Paper Tape in 3 color patterns
Turquoise and gold Gel pens
Black pen
Jewel brads
Clear blings

Double sided clear and foam tape


First I cut the 12x12 CS for the 3D cube, which turned out about 3.8x3.8 inches (9.5x9.5 cms), and left margins to glue the parts together. Please let me know if you're interested in a step-by-step tutorial.

I added Polka Dot Paper Tape in 3 color patterns all around the cube's connections of faces, both for decoration and to strengthen them.


Then I randomly decorated 5 faces of the 3D cube, using Michael Strong Honeycomb stencil, Ranger Distress Ink - Fired Brick, and Ranger Ink Blending Tool.
I stamped and cut the large Butterfly, and added clear blings to make it glamorous.
I stamped and cut the small Butterflies, and colored them using Gel Pens.

I stamped and cut the small Flowers and heat embossed them, then I added Jewel brads to their centers.


I glued all the images, using double sided clear and foam tape.

The large Butterfly, on the top of the cube, was glued only at its center, its wings flying in the air.


I added the sentiment, hand written with a black pen, on 4 faces of the cube.
I really enjoyed making this ATB, and it felt like spring is in the air (though it feels like summer in Israel).

I'm so glad I got creative again, and I hope this passion will last and grow.

(You can enlarge each photo by clicking on it)
Thanks for stopping by, I hope you enjoyed. Have a creative day! Dorly