Showing posts with label tutorial. Show all posts

Friday, November 6, 2015

Merry Christmas Card with Washi Tape and Christmas Tree with Tutorial

I'm Card Captain of the enjoyMichaelStrongstamps Yahoo Group for this week, so for 5 days I'll be showing you several works using Michael Strong's stamps. I hope you'll find them inspiring.

My 4th card for this week is a Merry Christmas Card with Washi Tape and 
Christmas Tree.

It is followed by a step-by-step tutorial, with photos.

I hope you'll try it and enjoy it… It takes less time to make the card than to post 
about it (lol)


Today's card is all about making the background papers yourself.
This technique is fun and easy, and it enables you to create various backgrounds, to make different cards.

I made the main background by stamping Snowflakesfrom Designs by Ryn on a leather textured red CS.


I also stamped the sentiment "Merry Christmas" on a scrap of the same red leather textured CS, and inked its edges using Platinum ink, the same ink I used to stamp the Snowflakes, to enhance it.
I also added 2 brads, all shiny and bright.
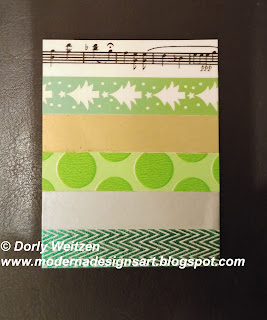
Then I used a piece of plain white CS, which I wrapped with several stripes of Washi Tape in Christmas related colors and themes.
You can use any combination of Washi Tape, I simply picked those which will pop out and will be contrasted to the red background. Once you're satisfied with the size of the wrapped CS, you can trim its edge off.

Here's the CS wrapped with Washi Tape:


And as Washi Tape sometimes has a tendency to become loose (it doesn't always stick to its place), I wrapped it behind both sides of the CS, and I adhered the 3D double sided foam tape on the back side of the CS exactly ON the Washi Tape's ends, so the foam tape secures them:


I stamped and heat embossed it on a scrap of the same red leather textured CS, then I cut it and added a few pearls for some more glam.
I adhered the Snowflakes background paper to the card basis, then the Washi Tape background paper and the decorated piece with the sentiment, using a double sided foam tape for a 3D effect.
I added the Christmas Tree on top of the Washi Tape background paper, also 3D. You can see it in 2 different color combos.

You can see the 3D effect here:


It sure feels like the right time to create Christmas Card.

We don't celebrate Christmas in Israel, but I'd like to send Christmas cards to my friends worldwide who celebrate Christmas.


Please let me know if you liked my tutorial, if it was clear (I'm always happy to answer questions), and if it made you want to create something similar.

(You can enlarge each photo by clicking on it) 
Thanks for stopping by, I hope you enjoyed. Have a creative day! Dorly

Thursday, March 14, 2013

Decorative Corner Bookmarks

This is my 4th creation for this week as Card Captain at the enjoyMichaelStrongstamps Yahoo Group.
It's Technique Thursday, so I used a tutorial I found in Hetty's blog - thank you, Hetty!


You can use any patterned paper and any flat embellishments to decorate your bookmarks.
Michael Strong's small stamps are perfect for decorating bookmarks, as well as other objects - they seem to fit everywhere!
Bookmarks are always useful (I read several books simultaneously), and a lovely addition to any gift, especially to books…


Supplies used:
ScorPal
Bone folder
Basic Grey and Making Memories 6" x 6" patterned papers
Recycled cereal box (white and kraft) and leather textured CS (red) for stamping
Ranger Distress ink - gathered twigs
Inkssentials Ink Blending Tool
Michael Strong stamps - Cloisonné Fan (small), Cloisonné Dragonfly (small), Hetty's Coffee Cup (small)
Emboss Ink
Embossing powder - black and brown
VersaFine ink - Onyx Black
Purple Sharpie marker


You can find the Tutorial here. The steps are easy to follow, and there's also a video tutorial.
For double sided CS, I used it as it is.
For patterned CS with a white back, I used Ranger Distress ink - gathered twigs to color the white part which can be seen after folding.


I folded the papers according to the instructions.
I stamped Michael Strong's stamps - the Coffee Cup and the Dragonfly - using Emboss Ink, and heat embossed it using brown and black EP.
I stamped the Fan using VersaFine ink - Onyx Black.
I cut them all with scissors and glued each stamp on a folded bookmark.


Here's how the bookmark looks on a book.
Don't forget to keep on reading…
(You can enlarge each photo by clicking on it)
Thanks for stopping by, I hope you enjoyed. Have a creative day! Dorly

Tuesday, July 24, 2012

Wonderful Heart Gift Box

I made this gift box for a special, wonderful woman with a very kind heart.
I think the design says it all.
I gave her this box with a tag and with a turquoise beads bracelet, hand made by me, as a gift to her.


Supplies used for the box:

Cream leather textured CS for the Box

Red leather textured CS

Basic Grey patterned paper - boxer
Ranger's Distress ink - Fired Brick
Wonderful stamp -DoCrafts
VersaFine ink - Onyx Black
Michael Strong's Cloisonné Heart Stamp (large)

Embossing ink

Gold EP

Clear blings

Scor-Pal

1" circle punch

Double sided foam tape


First I created the box out of cream CS, following Michael Strong's tutorial

My addition is a tip for an easy opening of the box.

After scoring and folding the CS, but before cutting and adhering its corners, I used a 1" circle punch to cut a HALF CIRCLE opening at the front side, where the box opens up (I simply inserted the circle punch half way and punched).

It creates a perfect notch to slide your finger in to open the box without wrinkling it.


I distressed the patterned paper using Ranger's Distress ink - fired brick.

I stamped Michael Strong's Cloisonné Heart using Embossing ink.

I heat embossed it using gold EP, and cut it with scissors.

Then I stamped the Wonderful stamp using VersaFine ink - Onyx Black.
I adhered both stamped images using double sided foam tape for extra dimension.
I added clear blings for a glamorous look.


(You can enlarge each photo by clicking on it)

Thanks for stopping by, I hope you enjoyed. Have a creative day! Dorly

Thursday, March 22, 2012

Coffee Lover Gift Box

Here is my 4th creation for this week as Card Captain of the enjoyMichaelStrongstamps Yahoo Group

I'm into boxes this week (you probably noticed that… lol), because they are fun to make and they also seem very practical for little gifts.
I created this box for a lady whose birthday is coming soon.
She loves drinking coffee, therefore I intend to send her this box with several Taster's Choice coffee and ice coffee bars and a little surprise gift in it.
It's Technique Thursday so here's the link to the technique I've used to create the background piece (inspired by Judy, thanks dear!)
It's called Faux Leather with Masking Tape and it's fun - try it!


Supplies used:
Cream leather textured CS for the box
Coffee themed CS (from an advertisement)
Recycled CS
Kraft CS
Scor-Pal
1" circle punch
Michael Strong's Hetty's Coffee Cup Set
Embossing ink
Bronze EP
ProMarker - Azure
Masking tape
Ranger's Distress Ink - faded jeans
Distress Ink applicator
Clear EP
Double sided foam tape


First I created the box out of cream CS, following Michael Strong's tutorial.

My addition is a tip for an easy opening of the box.

After scoring and folding the CS, but before cutting and connecting its corners, I used a 1" circle punch to cut a HALF CIRCLE opening at the front side, where the box opens up (I simply inserted the circle punch half way and punched).

It creates a perfect notch to slide your finger in to open the box without wrinkling it.
I created the background piece according to the tutorial, using recycled CS covered by masking tape pieces, colored by Ranger's Distress Ink (faded jeans) and heat embossed with clear EP.


I stamped Michael Strong's Hetty's Coffee Cup Set Coffee Cup (large) on kraft CS using embossing ink.
I heat embossed it using bronze EP and cut it with nail scissors.
I gave it a touch of color using ProMarker - Azure.
The background piece and the Coffee Cup were glued 3D for extra dimension.
Please note that the music sheet isn't part of the design, I only use it as a background when taking photos.

(You can enlarge each photo by clicking on it)

Thanks for stopping by, I hope you enjoyed. Have a creative day! Dorly

Tuesday, March 20, 2012

Spring Flowers Tea Box

Here is my 2nd creation for this week as Card Captain of the enjoyMichaelStrongstamps Yahoo Group

I created this tea box for a friend.
We meet often and have tea together, so she was very pleased to receive it, and as I guessed she likes purple!
I chose spring colors as spring is in the air - can you feel it?

First I created the box out of cream CS, following Michael Strong's tutorial.
My addition is a tip for an easy opening of the box.
After scoring and folding the CS, but before cutting and connecting its corners, I used a 1" circle punch to cut a HALF CIRCLE opening at the front side, where the box opens up (I simply inserted the circle punch half way and punched).
It creates a perfect notch to slide your finger in to open the box without wrinkling it.
Try it, it's simple and it works.

Supplies used:
Cream leather textured CS for the Box
Patterned paper by Crafty Individuals - Springtime (Book 3)
Light blue leather textured CS for stamping
Patterned paper for the Rosette (from a friend)
Scor-Pal
1" circle punch
Sizzix Sizzlitz Decorative Strip Die - Paper Rosette by Tim Holtz
Michael Strong Cloisonné Flower Stamp (small)
Embossing ink
Gold EP
Ranger's Distress ink - dusty concord
Large light green bling
Double sided foam tape


I distressed the patterned paper using Ranger's Distress ink - dusty concord.
I stamped Michael Strong's Cloisonné Flower using Embossing ink.
I heat embossed it using gold EP.
Then I cut it and added a large light green bling to enhance the flower's center.
The Rosette and the Flower were glued 3D for extra dimension.


(You can enlarge each photo by clicking on it)

Thanks for stopping by, I hope you enjoyed. Have a creative day! Dorly

Thursday, February 2, 2012

Mini Cards And Mini Envelopes

Here are my 4th creations for this week as Card Captain of the enjoyMichaelStrongstamps Yahoo Group.
I decided to share 2 Mini Cards and Mini Envelopes.
It's Technique Thursday, therefore I used the attached tutorial.

I have no idea where I got it from, so if you recognize its source please tell me so I can link back to it.

Supplies used:
Japanese patterned paper - Making Memories
Red and grey leather textured CS for stamping
Michael Strong's Cloisonné Fan Stamp (small)
Michael Strong's Cloisonné Christmas Tree Set of 3 (small)
StazOn ink - Jet Black
Embossing ink
Black EP
Scor-Pal
EK Success corner Adorner
TH scissors
A colorful checkered ribbon
Clear and red blings
Double sided tape

I created the mini envelope according to the how-to shown here.
I glued the envelope using double sided tape.
I used Making Memories double sided CS, so both the inside and the outside of the envelope look nice.
I cut two 3x3 mini cards out of the same CS, to match the envelope.
I rounded the envelope's and the cards' corners using EK Success corner Adorner.


I stamped Michael Strong's Cloisonné Fan small stamp on red leather textured CS using StazOn ink - Jet Black, and cut the stamped pieces using TH scissors.


Then I stamped Michael Strong's Cloisonné Christmas Tree small stamp on red and grey leather textured CS, heat embossed it with black EP and cut it carefully using TH scissors.

Then I added the colorful checkered ribbon, and also several clear and red blings for extra glam.
BTW the musical notes sheet was only used as a background paper for taking photos.
(You can enlarge each photo by clicking on it)

Thanks for stopping by, I hope you enjoyed. Have a creative day! Dorly

Thursday, November 3, 2011

Bookmarks With Japanese Fans

I'm Card Captain of the enjoyMichaelStrongstamps Yahoo Group for this week, so for 5 days I'll be showing you several works using Michael Strong's stamps. I hope you'll find them inspiring.
Today I decided to share 3 kinds of bookmarks, all with the same motif - the Japanese Fan.
I always read several books at the same time, so I find bookmarks very useful.
It's Technique Thursday, therefore I used Michael Strong's technique for painting the background paper and 2 other techniques for making the bookmarks.


I painted the background myself, using the technique shown at Michael Strong's tutorial

I sure know how to paint, yet making my own background paper is fun and always gives surprising results.
For the 1st bookmark I used this tutorial but changed it to my needs.
For the 2nd bookmark I used Shira's tutorial
For the 3rd bookmark there's no need for a tutorial, I'll explain about the materials I used.

These bookmarks are easy and fun to make, and you can add them as gifts to books.
Materials used:
Red leather textured CS for stamping
Transparency sheet
Black canvas textured CS for the painting technique
Acrylic paint – I used white, red, light blue and silver

Brushes, 2 sizes
StazOn ink - Jet Black
Michael Strong's Cloisonné Fan Stamp (small)

Large paper clip
Red and turquoise satin ribbons
Clear and red blings
Double sided tape
3D double sided foam tape
Crop-A-Dile
EK Success corner Adorner


First I stamped Michael Strong's Cloisonné Fan stamp on red leather textured CS several times and once on a transparency sheet using StazOn ink - Jet Black, and cut them all using TH scissors.
Then I created the painted background paper on black canvas textured CS.
For the 1st bookmark I adhered 2 stamped fans to a large paper clip (on both its sides) using 3D double sided foam tape, and added clear blings and a red satin ribbon.


For the 2nd bookmark I used the background paper, cut 2 triangles of it and glued them carefully.
I added a stamped fan on a transparency sheet and a red bling.


For the 3rd bookmark I used a scrap of the background paper, its corners rounded.
I added 2 stamped fans and large clear blings.

I punched a hole using the Crop-A-Dile and added red and turquoise satin ribbons.


(You can enlarge each photo by clicking on it)
Thanks for stopping by, I hope you enjoyed. Have a creative day! Dorly

Wednesday, November 2, 2011

Extra Sparkling Christmas Card

I'm Card Captain of the enjoyMichaelStrongstamps Yahoo Group for this week, so for 5 days I'll be showing you several works using Michael Strong's stamps. I hope you'll find them inspiring.
Here's my 3rd card for this week - another Christmas card, using Iris Folding again. What a fun technique, you should try it.
I re-used gift wrapping hologram papers for an extra sparkling effect.
You can find a very clear tutorial in Hetty's blog
You can find the pattern in Michael Strong's blog.
If you want your pattern to match the size of Michael Strong's large Christmas Tree Die Cutter, print it after resizing it to exactly 11.31x 14.86 cms (who said size doesn't matter? lol)


Ingredients:
Red leather textured CS for the card's basis
Black canvas textured CS for the Christmas Tree Iris Folding

Recycled gift wrapping hologram papers - shiny green and shiny silver with stripes and circles, and silver with white dots
White photo paper
Michael Strong's Christmas Tree Die Cutter
Snowflake punch (1 inch)
3D foam tape
Red blings


I used Michael Strong's Christmas Tree Die Cutter to cut a Christmas Tree shaped hole in my CS. It cuts like butter, it's a pleasure to work with these cutters (I'll save the cut-out tree for a later project).
I created the Christmas Tree Iris Folding on the back of my CS and turned it over, its textured side up.
I used recycled gift wrapping hologram papers - shiny green and shiny silver with stripes and circles, and silver with white dots which reminded me of snowflakes.


The papers were so sparkly that it was difficult to take a good photo of the card. Can you see how sparkling it is?
I glued the finished CS using 3D foam tape onto the card's basis for extra dimension.
I added several snowflakes, punched out of photo paper which is very white and resembles snow .
I added several red blings to add some glam.


(You can enlarge each photo by clicking on it)

Thanks for stopping by, I hope you enjoyed. Have a creative day! Dorly

Thursday, October 6, 2011

Iris Folding Christmas Card

I'm Card Captain of the enjoyMichaelStrongstamps Yahoo Group for this week, so for 5 days I'll be showing you several works using Michael Strong's stamps. I hope you'll find them inspiring.
For my 4th card for this week I decided to use the Iris Folding technique.
You can find a very clear tutorial in Hetty's blog.
You can find the pattern in Michael Strong's blog.
If you want your pattern to match the size of Michael Strong's large Christmas Tree Die Cutter, print it after resizing it to exactly 11.31x 14.86 cms (who said size doesn't matter? lol)
I used contrasting yet complementary colors in order to get a classical card.


Ingredients:
White leather textured CS for the card's basis
Black canvas textured CS for the Christmas Tree Iris Folding
Recycled gift papers – shiny red and silver with white dots
Michael Strong's Christmas Tree Die Cutter
3D foam tape
Clear and red blings


I used Michael Strong's Christmas Tree Die Cutter to cut a Christmas Tree shaped hole in my CS.
It cuts like butter, it's a pleasure to work with these cutters (I'll save the cut-out tree for a later project).
I created the Christmas Tree Iris Folding on the back of my CS and turned it over, its textured side up.
I used recycled gift papers - shiny red and silver with white dots, which reminded me of snowflakes.
The papers were so sparkly that it was difficult to take a good photo of the card.
I glued the finished CS using 3D foam tape onto the card's basis for extra dimension.

I added several clear and red blings to add some glam.

(You can enlarge each photo by clicking on it)
Thanks for stopping by, I hope you enjoyed. Have a creative day! Dorly

Thursday, August 11, 2011

Gift Boxes for Friends

I made 2 gift boxes for friends. I filled them up with small items: a notebook and a pen, an altered domino to be used as a magnet, a bookmark and a personal note.


First I created each box out of cream CS, following Michael Strong's tutorial.
I decorated each box with recycled postcards from an art exhibition, their edges distressed for a Shabby Chic look.
I added flourishes and stacks of flowers attached with a jewel brad.
The flowers were glued 3D with foam tape for extra dimension.

Supplies used:
Cream leather textured CS for the Box
Papers - recycled postcards from an art exhibition
Turquoise CS
Recycled kraft cereals package
Tim Holtz Tattered Florals die
Tim Holtz Elegant Flourishes die
Jewel brads
Tim Holtz stamps (various ones)
Pigmant Inks (several colors)
Ranger's Alcohol Inks (several colors)
StazOn ink - Jet Black
Scor-Pal
Double sided foam tape
I decorated each notebook with CS stamped with Tim's stamps.
The front side was covered with a piece of CS with a collage of Tim's stamps on it.
The back side was covered with a piece of CS with a single Tim's stamp on it.

The altered dominoes and the bookmarks were made using Alcohol inks and stamping with black StazOn ink on them.


(You can enlarge each photo by clicking on it)

Thanks for stopping by, I hope you enjoyed. Have a creative day! Dorly